

If you have been following our basement renovation series, you will know we are working on renovating our basement on a budget. So far, we have framed the new bedroom and furnace room, built a storage closet, and boarded the new walls. In this article, we tackle interior doors.
As you know, we are looking to save money on our renovation materials and are passing these tips on to followers. We needed to purchase doors for our renovation, and this article will explain how to buy interior doors – what to look for and how to install and paint them. If you can salvage your existing interior doors, you can save yourself even more money! Just give them a fresh coat of paint using the fast method explained below.
Buying Interior Doors On a Budget
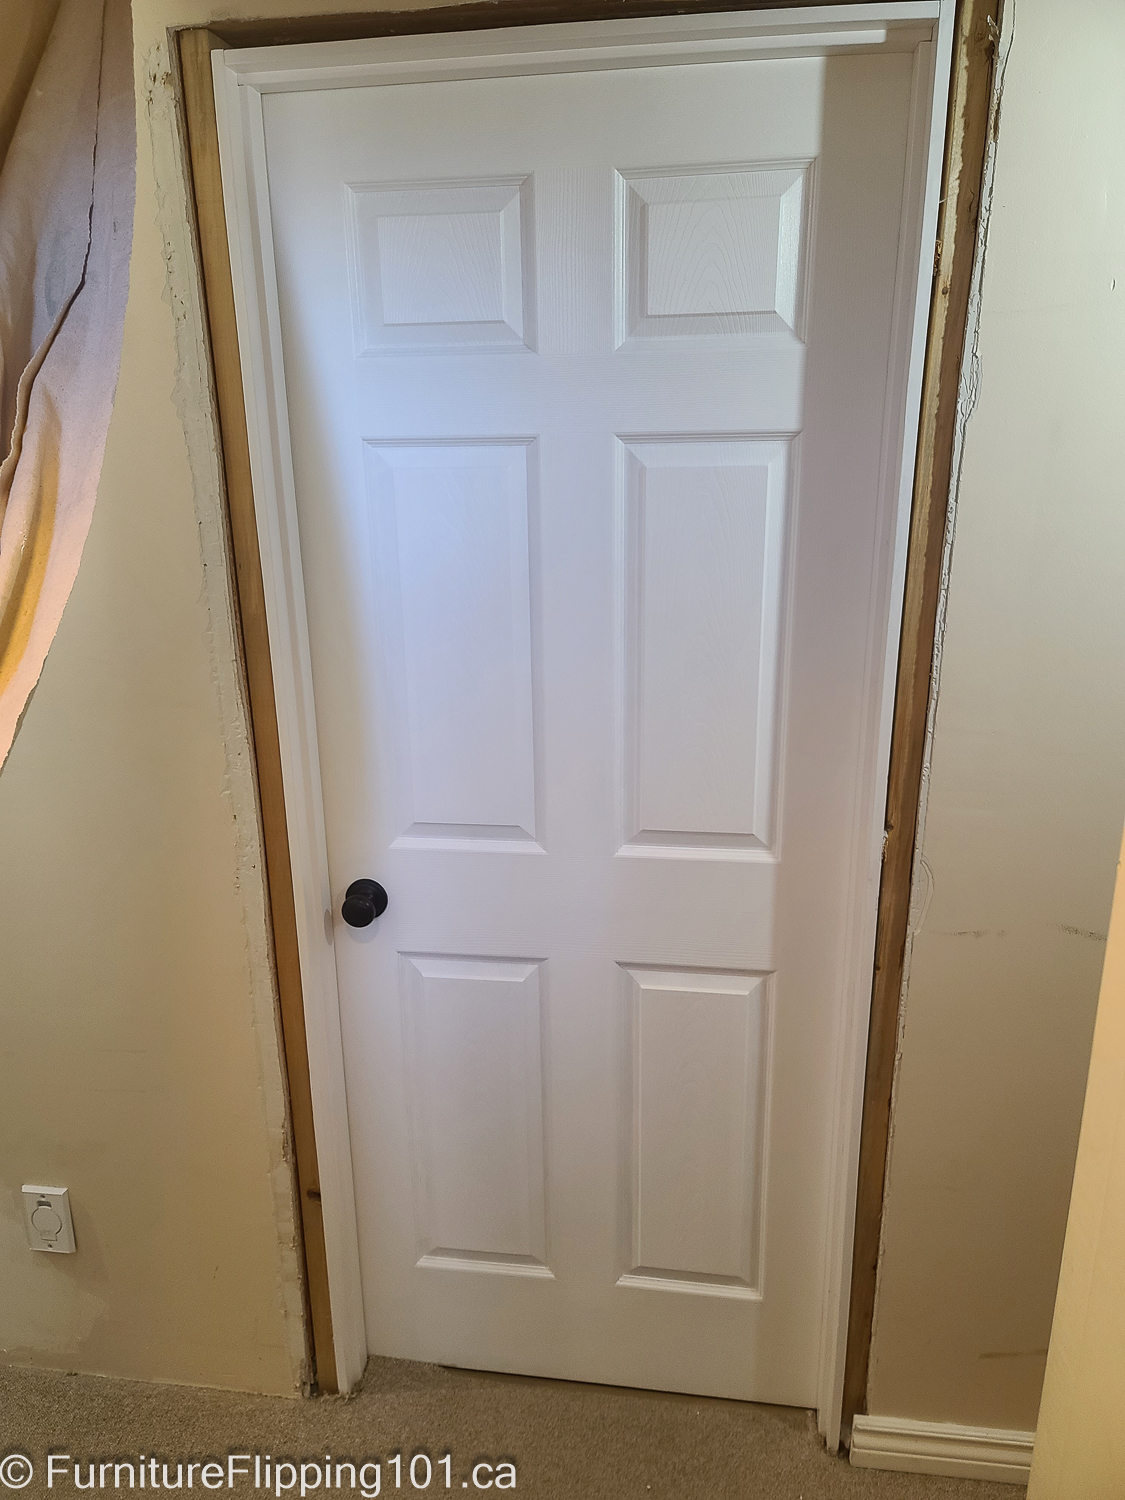
We decided to replace our painted flat-panel 1970 mahogany interior doors with six-panel doors as part of our renovation. We needed five interior doors for our upstairs hallway.
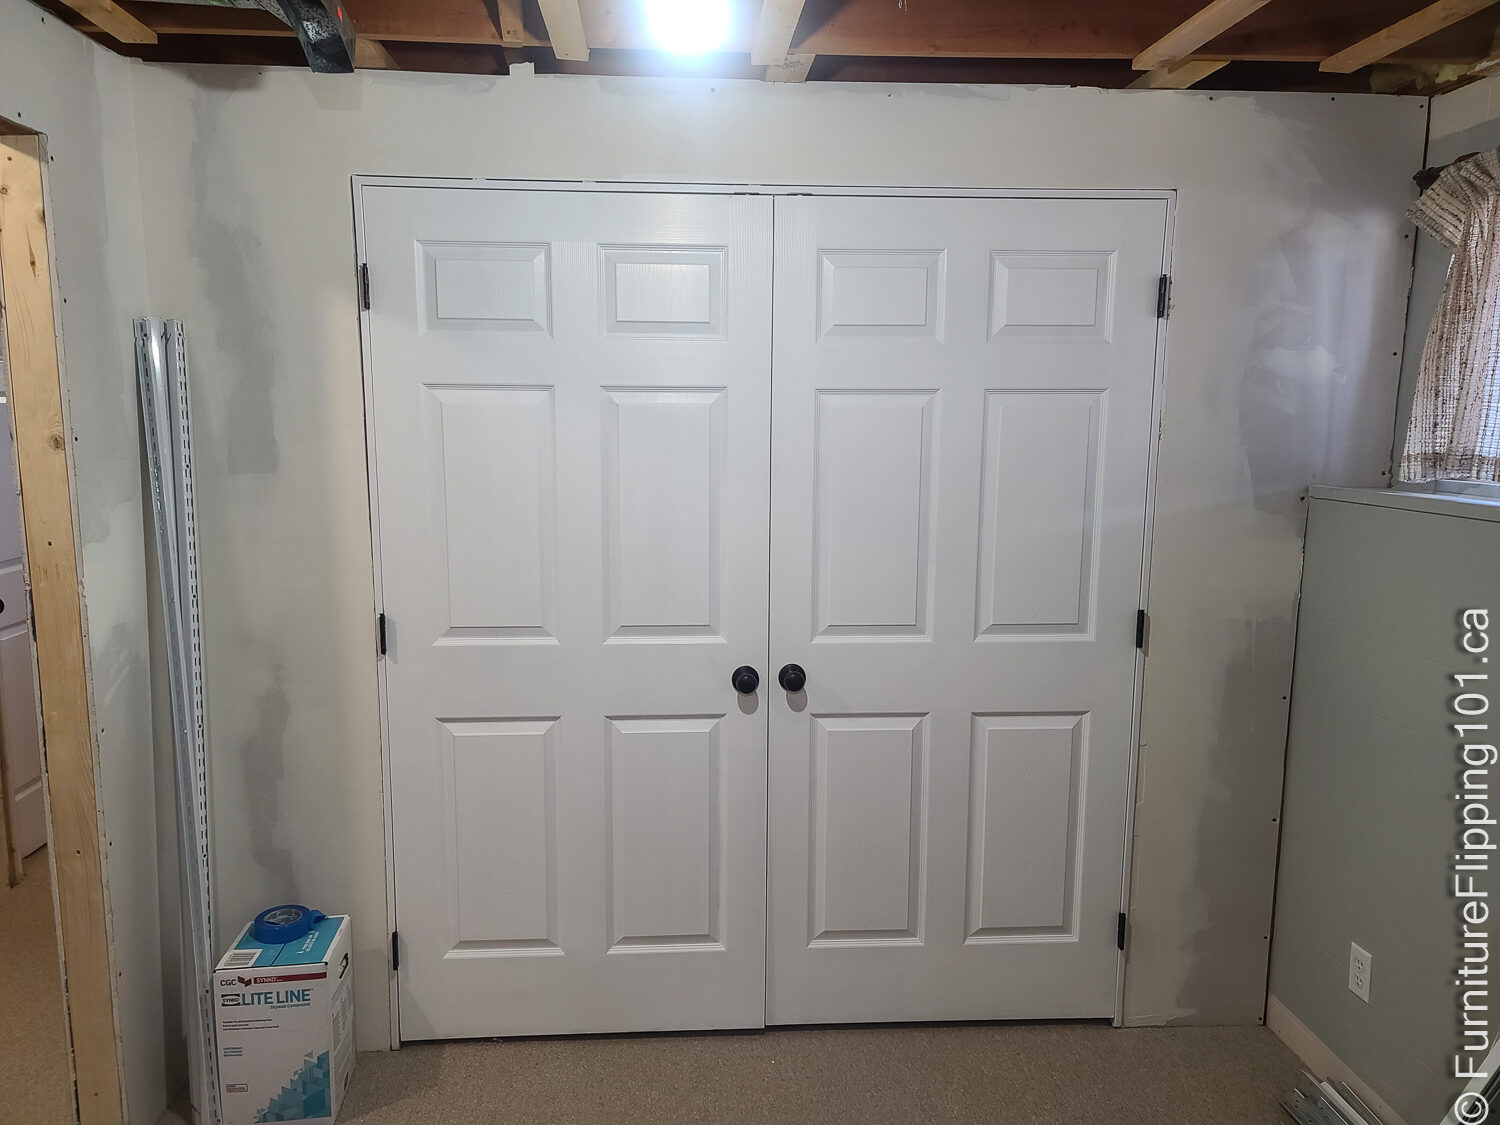
The basement needed two new 30″ left-hand inswing interior doors and two closet doors for the pantry we built. The furnace room didn’t have a door, so we added one. In total, we needed ten interior doors plus three door jambs.
How We Saved Money Buying Interior Doors and Baseboards
We have been slowly collecting interior doors secondhand off the Facebook marketplace and Kijiji, saving us a lot of money. New interior doors cost $120 a slab and $220 for prehung in our area, and we paid an average of $45 a door. Buying secondhand interior doors saved us around $750 (or more) easily! As we spotted a good deal on the right size and swing interior door, we bought it and stored it away.
We bought new baseboards and casing for the upstairs when we renovated. We got a contractor’s discount through a friend, which saved us a lot of money. For the basement, we found some 5″ baseboards and 3″ casing on MarketPlace for a reasonable price. There is too much for what we need, but we will sell the leftover.
One drawback of buying materials when you find a deal is you need to be able to store them until you can use them. You may not want to buy too far ahead if you don’t have a garage or open basement area.
For the door jambs, we purchased the material from Home Hardware for $90 or $45 a door. Home Depot charges $60 per door plus the doorstop for another $45, so we saved $75 on the two doorframes alone. It pays to price check before buying!

Four things to consider when buying interior Doors
To make sure the interior doors you buy work, you need to know the following:
1. Size
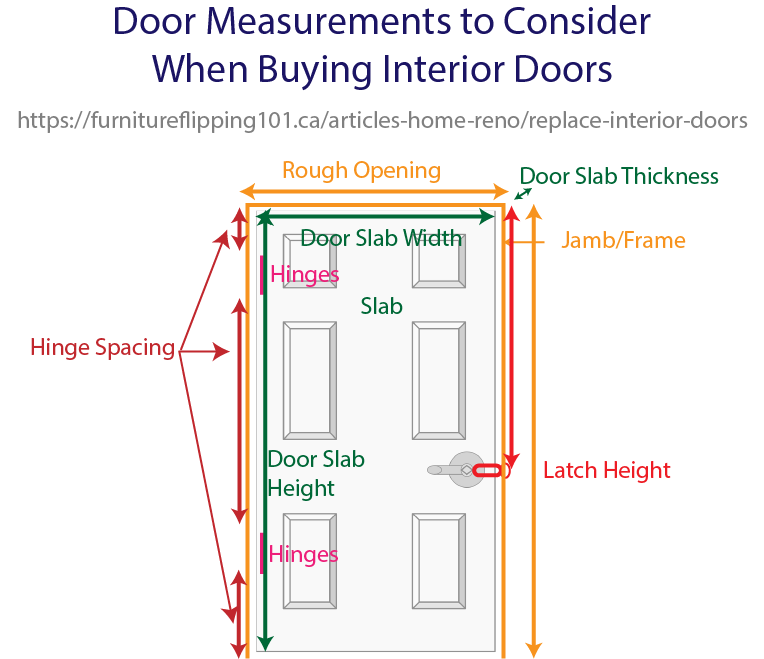
When buying a new or used door, you must know what size you need. If you install a new door, there are two measurements to know: rough opening and slab size. The rough opening accounts for the door jamb. Most manufactured prehung interior doors have a standard rough-opening size, so use these when framing your walls.
If you are replacing your interior doors, measure their width, height, and thickness. A ½” or less height difference won’t matter much – you will want some clearance for airflow. Most interior doors have standard sizes, but it pays to watch for discrepancies, especially since you can’t return a secondhand door. When measuring your door, allow for a gap at the bottom of the door to account for your flooring height (carpet, tile, wood).
2. Swing
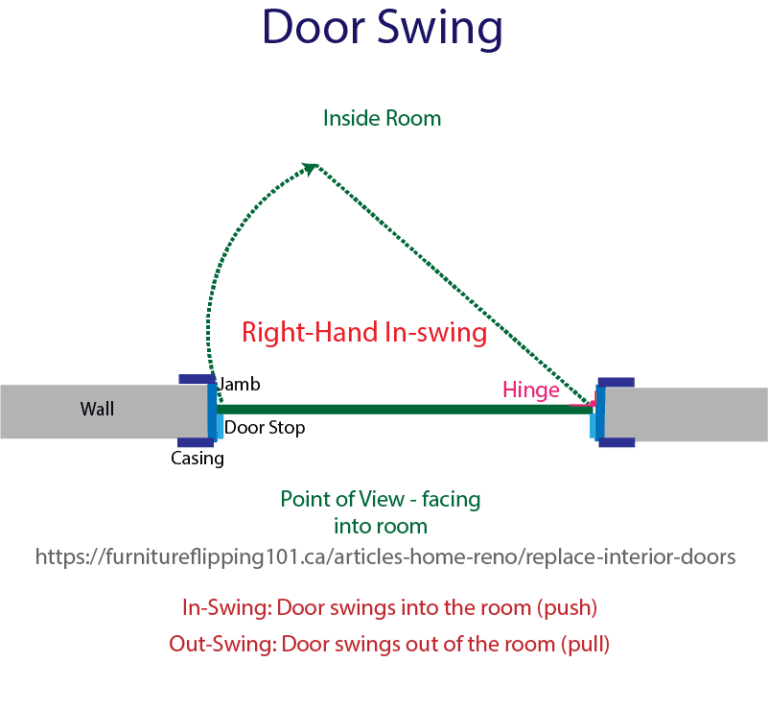
Another thing to consider when buying interior doors is their swing. Inswing refers to the door swinging inward – you push it open. Outswing refers to the door swinging outward – you pull it open. Inswing is the most common. The direction left, or right refers to the direction the door swings when facing into the room. A right-hand inswing is the same as a left-hand outswing in design. But you refer to doors by the room they open into, so use the term right-hand inswing, except when you install a door that opens out of the room.
Most of these interior doors had hinges and handles already cut, which determined their swing. A few doors were new slabs, which can be either swing. If buying a prehung door, you also need to know its swing.
3. Hinges - Quantity and Style
We also have to add some hinges to our existing door frames – our old doors have two hinges, and some of our new doors have three per door. So, while we saved a lot of cash buying secondhand, we knew we would have more work prepping the used doors to hang.
If you need to buy hinges for used doors, note whether the hinge cutout has a square or round corner and measure the cutout height and depth. Also, pay attention to the screw pattern. If possible, and the screw holes aren’t stripped, you should match the old style.
If the holes are stripped, you can repair them with small strips of wood (like a matchstick) and wood glue. Fill the holes with the wood and glue, then cut the wood flush once the glue dries. Mark the new hinge location and drill pilot holes for the new hinge screws. Loose screw holes can cause problems when hanging interior doors, so fix these first.
4. Latch and Hinge Height
To cut in a new latch hole in a door slab, measure down to your existing door latch is in the door jamb. If you are buying a used door, this height can vary, and you may need to make a different hole in your jamb (easier than a new hole for the doorknob latch).
To measure, measure from the top of the doorjamb to the centre of the latch and each hinge.
* Buying used interior doors - precut hinges and latch height
You can measure the distances between the hinges and the latch height, but it is quite possible with used doors that the used door’s cutouts will not match yours. We will show you how to fill and recut the hinges in an upcoming video. As noted, you can make a new latch hole in the jamb to match the used door’s latch height.
Slab vs. Prehung
There are two options when buying interior doors, slab or prehung. If you are replacing a door, buy a slab; if you are installing a new one, you can buy a slab or prehung.
If you buy a slab, you can buy the materials to build a jamb as we did. You will need a five-inch jamb (4 9/16″) and door stop, a narrow board you nail to the jamb to keep the door from over-extending into the room.
Door slabs do not have hinge or door holes. Prehung interior doors include hinges, a doorknob hole precut (no doorknob), and a three-part (sides/top) door jamb. Almost all purchased interior doors (unless bare wood) come primed by the manufacturer.
You can cut in the hinges and door knob holes using jigs designed for the process. You will need a drill, chisel, and possibly a router. Check out the products below.
Tools you will need to install knobs and hinges in an interior door slab and jamb:
Adapting Used Interior Doors
Ideally, you will buy the right doors for your needs, but you can adapt them to suit if the price is right. We had purchased two 36″ right-hand inswing, prehung interior doors a while ago, thinking they would work for doors in the basement. We eventually went with a different plan but found we could use the doors and their frames on our new pantry.
Using the doors meant adapting them to suit the situation. Since the pantry doors would open from the middle outwards, we didn’t want two right-hand swing doors. We had to fill in the hinges and cut new ones for the one door to swing left-handed.
We used a ball catch on the tops of the doors so they would stay closed rather than having a middle frame. Giraud used the prehung frames to build the door jamb rather than buying new materials. We filled in all of the unneeded holes with modelling paste and primed the patches.

Buying Baseboard and Casing
When buying trim, you need to know the linear measurement of the room or doorway. Add 10% for waste. Your baseboard and casing should match your existing rooms unless you are replacing them all. If you can’t find a match, make it as close as possible so the difference isn’t noticeable. Usually, the baseboard is bigger and thicker than the casing. The casing goes around the doorframe, running to the floor, and the baseboard butts up against it.
Painting Interior Doors and Trim
It is better to paint interior doors and trim before installing them to avoid needing to tape off hinges, handles, floors, and walls. The baseboards are much easier to paint at waist level than kneeling on the floor. Once installed, you can quickly fill and touch up the air nailer holes with paintable caulking and paint.
After you try the methods described below, you will see how much simpler and less stressful it is than painting them in place.
Clean, Prime, and Repair
Although it saved us money buying secondhand interior doors, it also meant we had no idea what the previous owners had done to them before we got them. Two of the doors had what I suspected was oil-based paint: the paint was very glossy and hard. When we started painting them, we discovered it was definitely oil-based paint, so we washed off the water-based paint and primed them with some Zinsser Bin2™ oil-based primer. This primer is a good bridge between the two product classes and is suitable under water-based paint.
If you run into this problem, do not try and ‘make’ the paint stick – it will peel off later once it dries. Use a good primer and prevent future problems.
Always clean used doors before painting to ensure you have no adhesion problems due to grime from use. Before we set up the doors, I gave them a good wash with soapy water and used mineral spirits to remove some foreign debris. These doors had some water staining and oily stains, so I spot-primed these areas as well to prevent bleed-through. We also had to make some repairs, gluing down a chipped piece with CA glue and clamps. Sand off any bumps and rough spots, and spot prime if you go through to bare wood.

Existing Baseboard and Casing
If you are painting existing baseboards and casing, you can remove and paint them using the following method. You will need to pull the nails before painting. If you wish to leave the trim in place, tape off the floor and walls to make it faster. You will need to wash them and sand off any rough spots. Tape off any existing doorjambs and paint those before installing the new interior doors.
If you also plan on painting the walls (why not!), then paint the trim first and then tape it off to paint the walls, finishing with a bead of caulking to seal the tops of the baseboard to the wall.
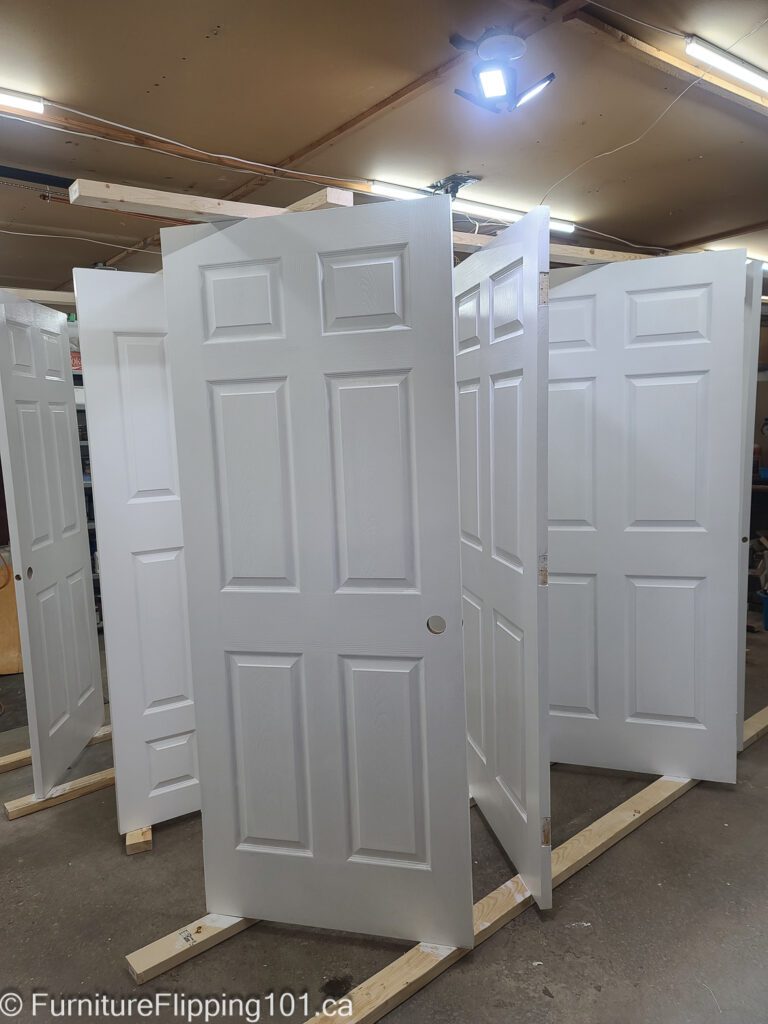
Simple No-Stress Method to Paint Interior Doors and Trim
Painting a lot of interior doors or trim is a big job. If you paint the interior doors in place, you must mask off any areas that might inadvertently get painted, like walls, floors, hinges and doorknobs. Rather than doing this, there is a way to make this big job less daunting. Use the following simple, no-stress way to paint interior doors.
This video demonstrates how to use a simple 2×4 bracing method. This method allowed us to paint ten interior doors on both sides, three coats each in 24 hours. The available space limits the number of doors and the amount of trim you can paint, but this method takes up way less space than laying the doors flat on a sawhorse. Plus, you can paint both sides without waiting for the other to dry.
Tools and Materials Needed to Paint Interior Doors and Trim
We used the 2×4 framing materials we purchased for the basement to create our braces. Measure your space to determine the layout and board lengths – with the doors set at a 45° angle, you won’t need as much width as had you set them at 90°.
We made two rows, put a door in the centre, and had one leaning on the garage door. Depending on your area, you may get one long row or two or three shorter ones. You can buy 2x4s in several lengths. Use what you have on hand, or buy lengths you can use later. Consider the material’s future use. For example, a 16′ is better than a 12′ if cutting them into studs after. Each row needs three 2x4s, two on the bottom and one on the top, plus screws to assemble it.
The screws need to be long enough to go through the 2×4 into the door. We used 3″ screws and an impact driver. I recommend hearing protection when using this type of drill. You will need a ladder to reach the top of the interior doors.
For painting, you will need roller sleeves, a roller handle, a paint tray, and paint, possibly primer. If you prefer, you can spray the doors and trim.
Bracing the Interior Doors to Paint
The bottoms of the doors are not secured. Secure the tops with one 2×4 down the middle of the doors. It will take two people to set up the bracing. Make sure you centre the screw over the middle of the door and don’t go out the side.
Set the doors at a 45° angle with a gap between them to give yourself room to paint the door edges and crouch down to paint the bottom of the door. If you have enough space, leave enough room to move between the doors and reduce the number of steps to the paint tray. The first two doors are set in place and braced, and then you can add doors one at a time to the row until you run out of room. The more doors you add, the more stable the structure becomes. We added a cross piece for a missed door.
For painting the trim, use two sawhorses and, if needed, boards along the face of the sawhorses to extend your space. Wide, flat boards are more stable than 2x4s, but use what you have available. Make sure you can still reach the middle boards comfortably – you may be able to get more boards on the wider you go, but it only helps if you can paint them!
Painting the Interior Doors and Trim
If you have a paint sprayer, you could use it to paint the doors and trim. We used paint rollers, starting with a large (wall) roller to apply the paint to the flat surfaces. We backrolled the flat areas with a small, 4″ microfibre roller to create a nicer finish and cut into the panel edges. Don’t paint the hinge cutouts, if possible. Extra paint in the hinge area can cause problems with hanging the doors.
Once the first coat was on, we used the 4″ roller to paint the rest. The first coat always takes more paint, and it would have been a lot more work to apply it with a 4″. While the roller sleeves say they are lint-free, they are not. We had to pick out a lot of lint, even after using the roller for a while. The roller will also break down, especially the tip used to roll the panel edges, so change these when you notice they aren’t holding paint for very long.
We put two coats of paint on the first day and finished with a third on the second day. The first two coats took a gallon of trim paint. I use the base white for our trim instead of getting a custom tint. Use a paint that is labelled trim or cabinet paint. Wall paint is not durable enough for interior doors and trim. We chose a semi-gloss to make cleaning easier.
When painting, the challenge is keeping track of what you’ve painted without missing any spots. When disassembling, we noticed I’d missed a third coat on one of the doors. But it would be inside the closet, so we decided two coats were enough.
I also painted the doorjamb and stop for the basement interior doors, using the same 4″ roller. Paint the sides and then roll the surface. You don’t need to paint the back of the pieces. We taped off areas like the floor that might get paint on for the existing door jambs. The jambs we painted didn’t have casings, but you can tape off the walls if you have casings.
Installation
Once the paint has dried enough to handle the interior doors (follow the instructions on the can), you can disassemble and install the doors. If you need to cut the hinges, use a jig and a router. Install the doorjamb and door stop, then the hinges on the jamb and door.
With a helper, have one person insert the top hinge and the other drop in the pin, working your way down the door to the bottom hinge (not all interior doors have three hinges).
Install the doorknob and test whether the door opens and closes correctly. If the door rubs, you will have to adjust the hinges, possibly using cardboard shims under the hinges. You may also need to shim the doorjamb to get it plumb and the opening the correct size.
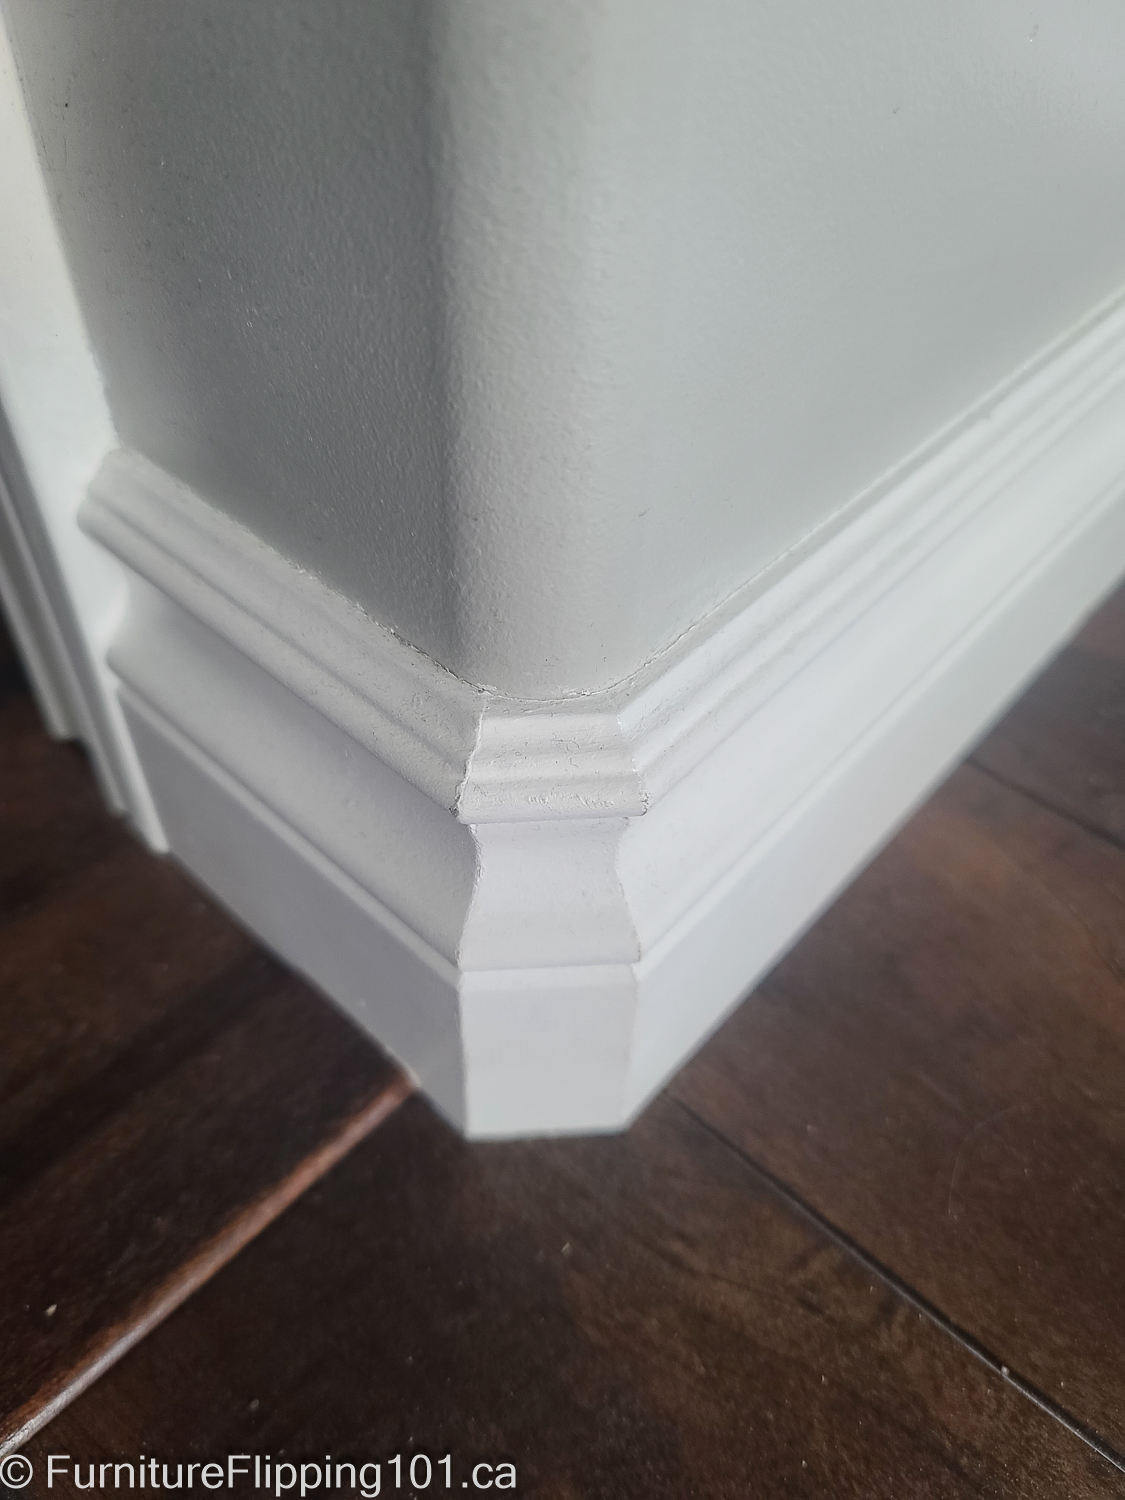
Install the baseboard and casing with an airnailer and brad nails. If you don’t have a compressor, you could use a hammer and finishing nails, but it will take much longer. Use a coping saw to cope the baseboard profile on inside corners for a professional finish.
Cut the baseboard at a 22.5° angle for round outside corners, with a centre section. Use CA glue and activator to glue them together, then attach them. Cover any nail holes and seal the top edge with paintable caulking and then paint.
Now stand back and admire your hard work and new interior doors and trim!


